

Exporting a Subset of your Data to a GEDCOM File
Sometimes it is useful to export a subset of your large file to a GEDCOM file. The most common reason is to send some data to a friend or another genealogist. They may not be interested in your entire file, but would rather want to see only selected individuals. This tutorial explains how to export the required subset GEDCOM file. The basic steps are:
- Create a new album to hold the subset data
- Fill the album with records to be exported
- Proceed with one of these two options:
- To share with others Export the GEDCOM data from the album
- To organize your own files Merge album into a different genealogy file
If the exported data has no multimedia (or is merged into a different genealogy file), the above steps complete the task. If you want to include all multimedia with an exported GEDCOM file to send to your friend as well, use this additional step:
- Include multimedia with the exported data
Two important comments before proceeding:
- A special case of a subset is your entire file and thus this tutorial also applies to exporting all your data. To export an entire file, skip the first two steps and proceed to one option in step 3.
- Both GEDitCOM II and GEDitCOM includeGEDitCOM II includes the Share GEDCOM File extension that automates the export steps in this tutorial. The extension can be used when exporting an entire file with multimedia or if the subset happens to be the individuals in the current family tree or the ancestors or descendants of a particular individual (note that sharing members of current family tree only available in GEDitCOM II). The Share GEDCOM File extension, however, cannot automate filling an album with customized data and then exporting that data. This tutorial covers that task.
Create a New album

Start by creating a new album, which can be done by using the File→New Album menu command or by clicking the "New Album" icon in the index window. Once the album is created, double click its name and pick a name. This tutorial will call it "Subset".
Fill the Album with Records
The key step in exporting a subset of your data is selecting the data for the subset by moving records to the "Subset" album created in step 1. There are many options for adding records to the album. Here are some common ones:
- An Individual's Ancestors - a common need is to export all or selected ancestors for an individual. The process is:
- Open the individual's record
- Open an Ancestor Tree for that individual
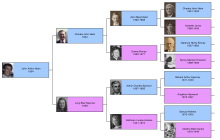
- Expand or contract tree branches until exactly the individuals you want are showing in the tree. You can expand or contract branches with the arrow buttons (hint: to expand all generations in a branch, hold the option key down while clicking the arrow).
- When the tree is ready, choose Tree→Send Tree Members to Album→Subset to send all visible individuals in the tree to the new "Subset" album.
- Note: if your entire export includes members of only one tree, you can automate the export with the Share GEDCOM File extension.
- An Individual's Descendants - similarly, you can collect someone's descendants in the album. The process is the same as for ancestors, except you work with Descendant Trees instead of an Ancestor Trees.
- All Relatives of an Individual - besides tree members, you can add all records found in a report to an album. For example, to move an individual's relatives to an album:
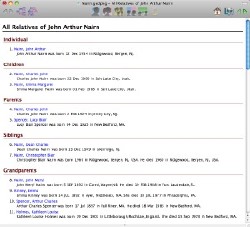
- Open the individual's record
- Choose Reports→All Relatives... mean command and get the report
- Choose Tree→Send Selected to Album→Subset to send all records in the report to the new "Subset" album.
- Search Results - if you want to export records meeting some search criteria, you can:
- Choose Tree→Search menu command
- Enter search criteria and do the search
- Choose the "Subset" album from the "Send All Hits In" menu in the search window. All search hits will be moved to the album
- Drag and Drop Records - you can drag records from any location and drop them on the album.
- Selected Records - for any window where you can select record(s) (mainly the index window), you can select records and then use the Tree→Send Selected to Album→Subset to send them to the album.
- Multiple Methods - you can combine any of the above methods to populate the album.
Note - you only need to add the main records and usually only the individual records for the data to be exported. When you proceed to the following steps, GEDitCOM II (or GEDitCOM) will automatically include all family records required to link those individuals along with all relevant notes, sources, multimedia, and research logs.
Export the GEDCOM data from the album
To export the records in the album choose the File→Export→GEDCOM Data... command. A dialog sheet will apear with numerous options. The options in the top section are:
- Records: Choose the "Subset" album to be exported (if you are using this tutorial to export your entire file, select "All Records" instead).
- Character Set: "UTF-8" is the best choice, but if the software to be used by the person receiving your file cannot handle that set, you can try exporting again and switching to "Window (Latin 1)" or "ANSEL".
- Line Ending: Line ending should not matter, but some Windows software requires the "CR+LF" option (for carriage return and linefeed).
- Max Line Length: The GEDCOM standard limits lines in the text file to 240 characters (and this is the default export setting). Some GEDCOM applications are smart enough to handle longer lines, but for others you might need to leave it at 240.
The bottom section has numerous options for the exporting style. If you are exporting to send to someone who does not have either GEDitCOM II or GEDitCOMGEDitCOM II, you should pick one of the GEDCOM 5.5.1 or 5.5 styles. It is best to start with the first GEDCOM 5.5.1 with multimedia records. If your friend's receiving software cannot handle that file, you can try the other GEDCOM 5.5.1 or the GEDCOM 5.5 styles. One of those should work. If you are exporting a subset for a friend to import into GEDitCOM II or GEDitCOM, choose one of the GEDitCOM II options (usually "records only" when exporting an album or sometimes "with settings and thumbnails" when exporting the entire file.
Finally click "Save" and save to a file with extension ".ged" (e.g., "Subset.ged") in a new folder on your Desktop (e.g., a folder called "Transmit").
If your data does not have any multimedia, you are done and can transmit the "Subset.ged" file to your friend.
If your exported data has multimedia and you want to transmit the multimedia along with the file, you should continue to the next step as your best hope of transmitting multimedia objects. Note: if you intend to reopen the file in GEDitCOM II or GEDitCOM on the same computer, you can skip the next step even if you have multimedia, because both GEDitCOM II and GEDitCOM should be able to read the multimedia from this first export.
Including Multimedia Files with the Transmitted Data
If your data has multimedia, use the following steps to transmit copies of the multimedia objects as well. These steps give you the best chance the other software will recognize the multimedia. If the receiving software does not find the multimedia prepared by the following process, it is likely that software is just not capable of reading multimedia objects. At least your friend will have copies of the multimedia objects.
- Open the "Subset.ged" file exported above in GEDitCOM II or GEDitCOM.
- Choose the Tree→Multimedia Options command and click the "Options" tab in the window that opens.
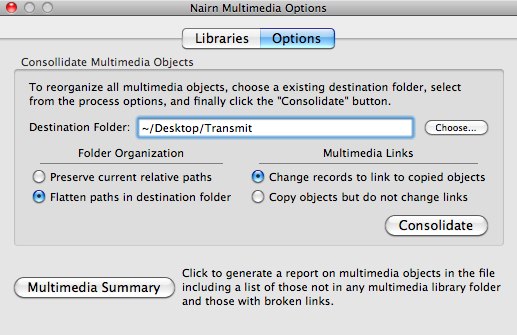
- Click the "Choose..." button and select the "Transmit" folder created when the file was first exported. Select the options in the "Consolidate Multimedia Objects" section as shown in the image and click "Consolidate". This process will copy all multimedia needed for the subset file to the "Transmit" folder and make sure the records in the file link to the new copies.
- Finally, choose File→Export→GEDCOM Data... and export again by the methods from above. Be sure to save the export file in the same "Transmit" folder. You can just replace the previous "Subset.ged" file because it is no longer needed.
A convenient method to transmit "Subset.ged" and all multimedia files is to control-click on the "Transmit" folder in the Finder and select the "Compress 'Transmit' " command. This step will create a ".zip" file to give to your friend. They will need to extract the files to a folder and import the GEDCOM file into their genealogy software. With luck, their software will find the multimedia.
Merge album into a different genealoigy file
If your plan for exporting a subset is to import into a different genealogy file on the same computer, you should use the steps in this section (and then you will be done). If you have any other plans for the subset file, you should be use the above steps to export GEDCOM data instead.
To incorporate the album created above in a second genealogy file on the same computer, use the following steps:
- Open the second file along with this first file at the same time in GEDitCOM II or GEDitCOM.
- Click on the index window of the second file and the then choose the "Merge..." menu command
- In the dialog box, pick the first file from the "Documents" menu (it may be the only option if only two files are opened) and then select the "Subset" album created in previous step from the "Records" submenu.
- If desired, pick an album name for the merged records or add the option to attach a note (see GEDitCOM II or GEDitCOM help window for details on these options).
- Click the "Merge" button to import all records (and any needed associated records) into the second file.
When done all information needed by the records in the "Subset" folder will be incorporated into the second file. An advantage of "Merge..." versus other methods is that identical records will be combined. In other words, if the files share records, the merge should not create extra copies of some individuals. For this process to be as accurate as possible, you should let GEDitCOM II or GEDitCOM attach universally unique IDs to all records. This option is used by keeping the "Track UUIDs" checked in the settings (or preferences window) (it is activated by default when you first start using GEDitCOM II or GEDitCOM; see preferences help for some more details).